SABnzbd - Usenet Download Client
SABnzbd is a well established open-source Usenet download client. SABnzbd is a multi-platform binary newsgroup downloader. The program works in the background and simplifies the downloading verifying and extracting of files from Usenet. SABnzbd uses NZB files (similar to .torrent files, but for Usenet), instead of browsing Usenet directly. NZBs need to be downloaded from Usenet indexing services, which we will configure in Prowlarr.
Additional Application Information - External Links
- Local WebUI Address: http://localhost:8100
- Application Website: https://sabnzbd.org/
- Docker Information: https://docs.linuxserver.io/images/docker-sabnzbd
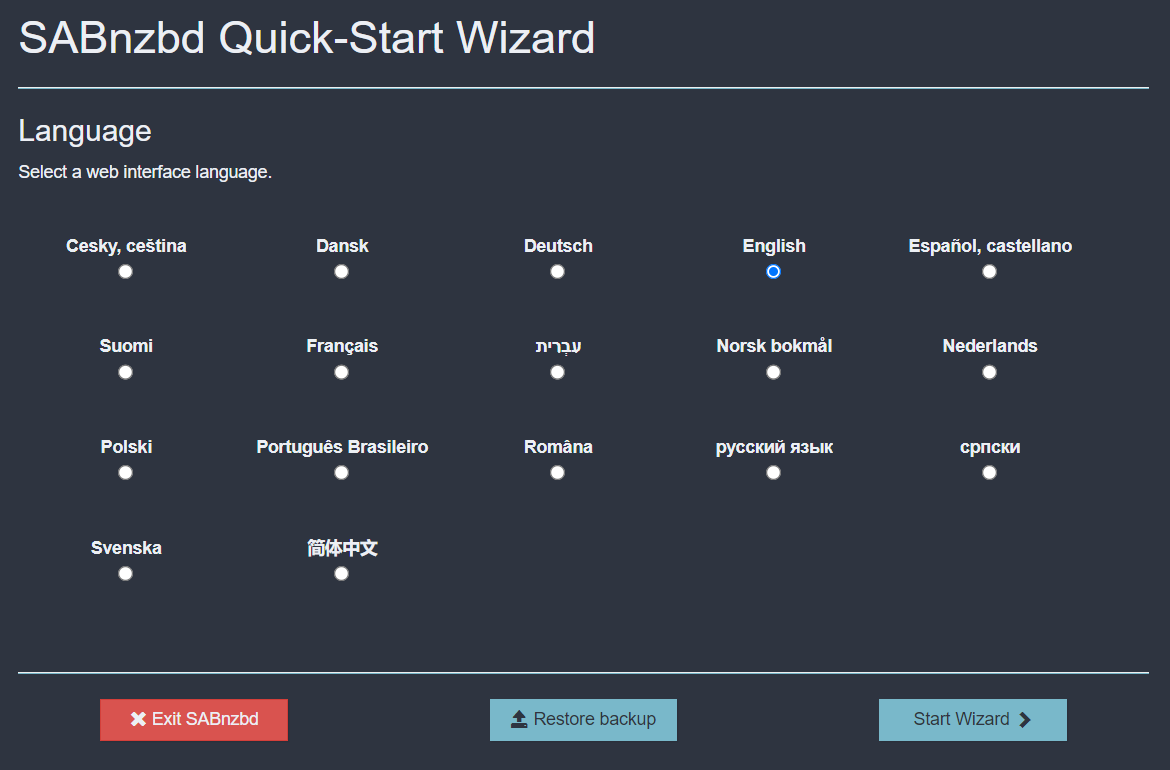
Quick-Start Wizard
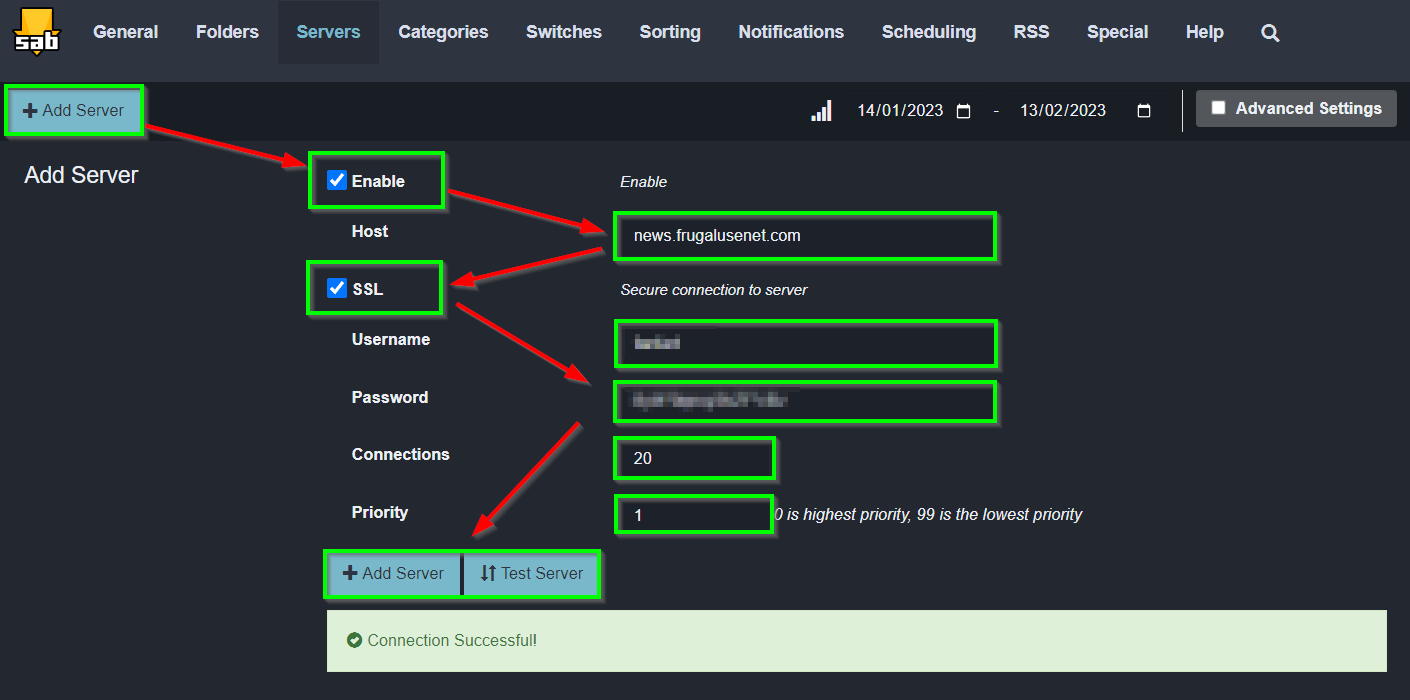
Go to the SABnzbd WebUI. If this is the first time using the application, you will be presented with the SABnzbd Quick-Start Wizard, choose your desired langauge and select Start Wizard to continue.
Enter the server, username and password for one of your Usenet servers, enable "SSL" encryption, and then select Test Server to test the connection.
Select Next if the server test is successful.

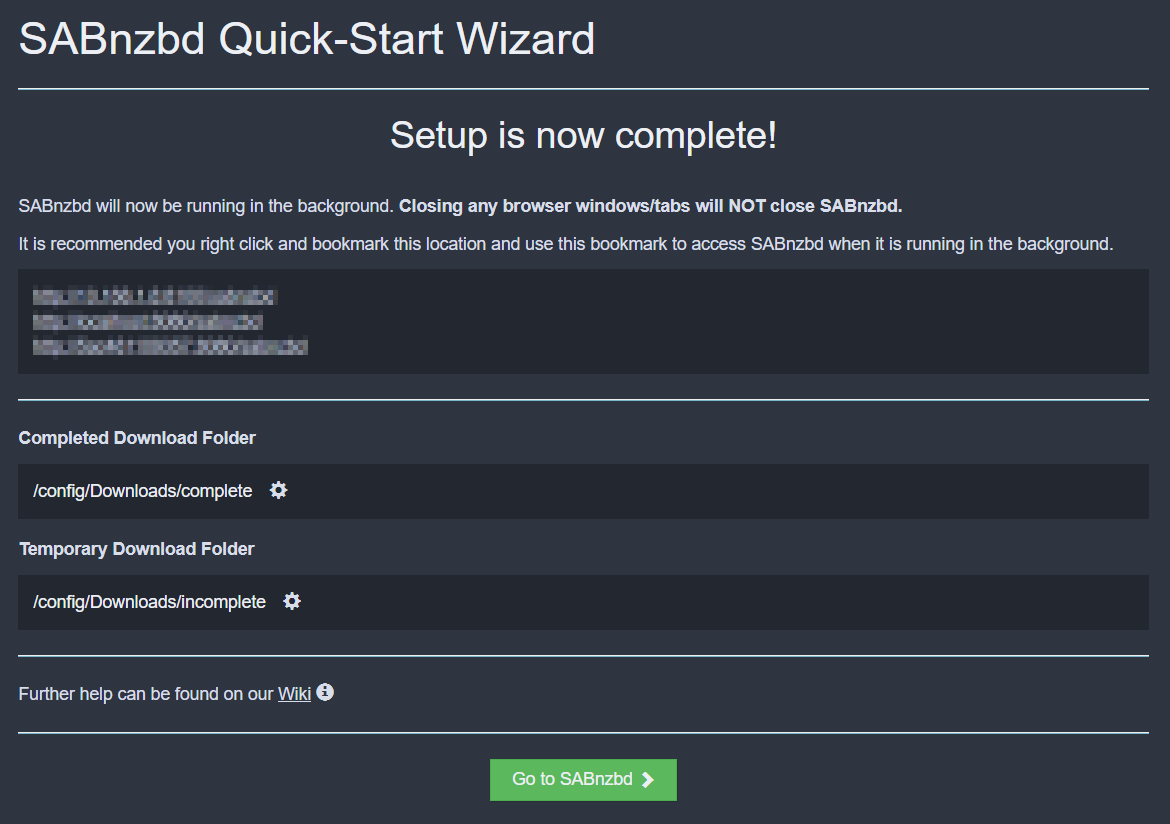
You will then be presented with the Setup is now complete! page, however the links and the download folders will be incorrect.
Select Go to SABnzbd to close the Wizard, we will update the incorrect settings in the next steps.
Change Default Settings
Select the Cog Icon on the top right, and open SABnzbd Settings.
General Settings

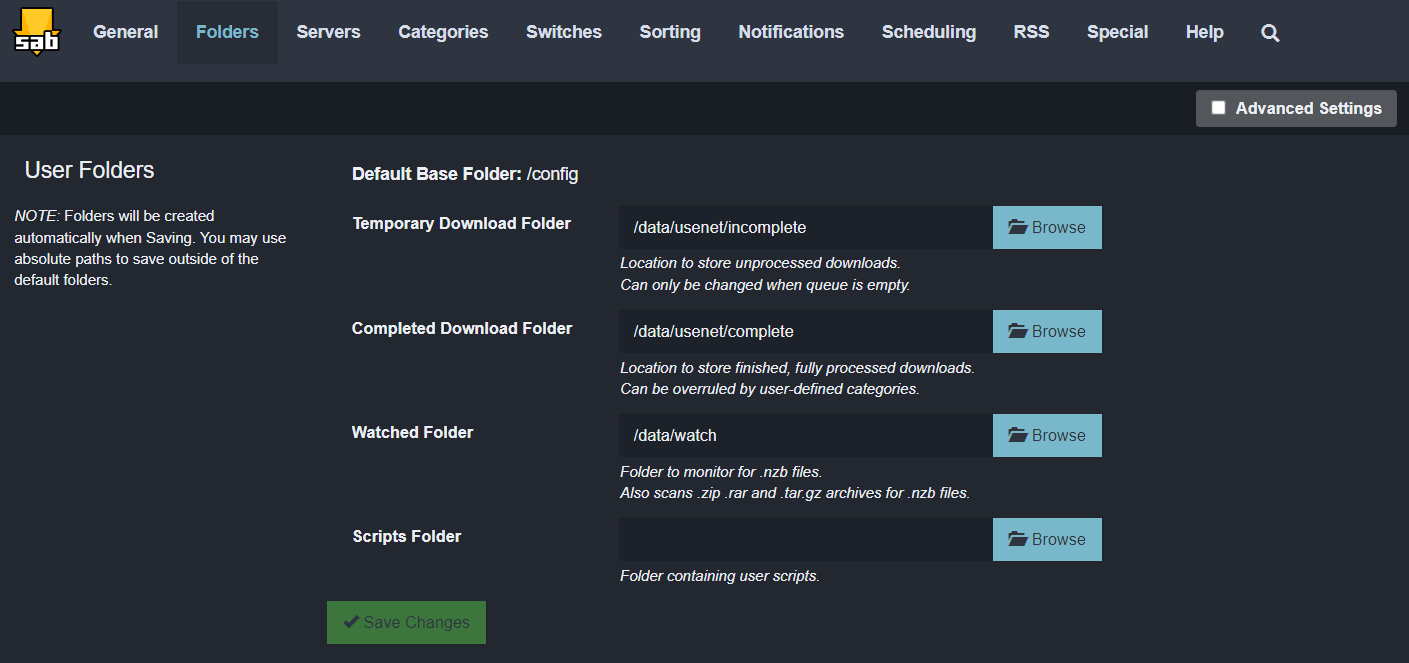
Configure Working Folders
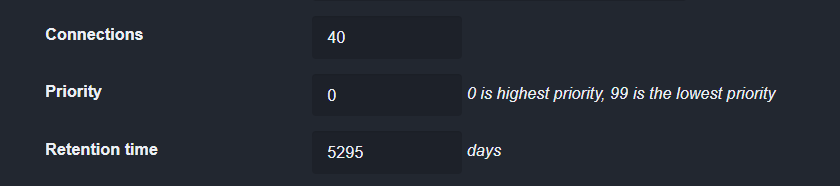
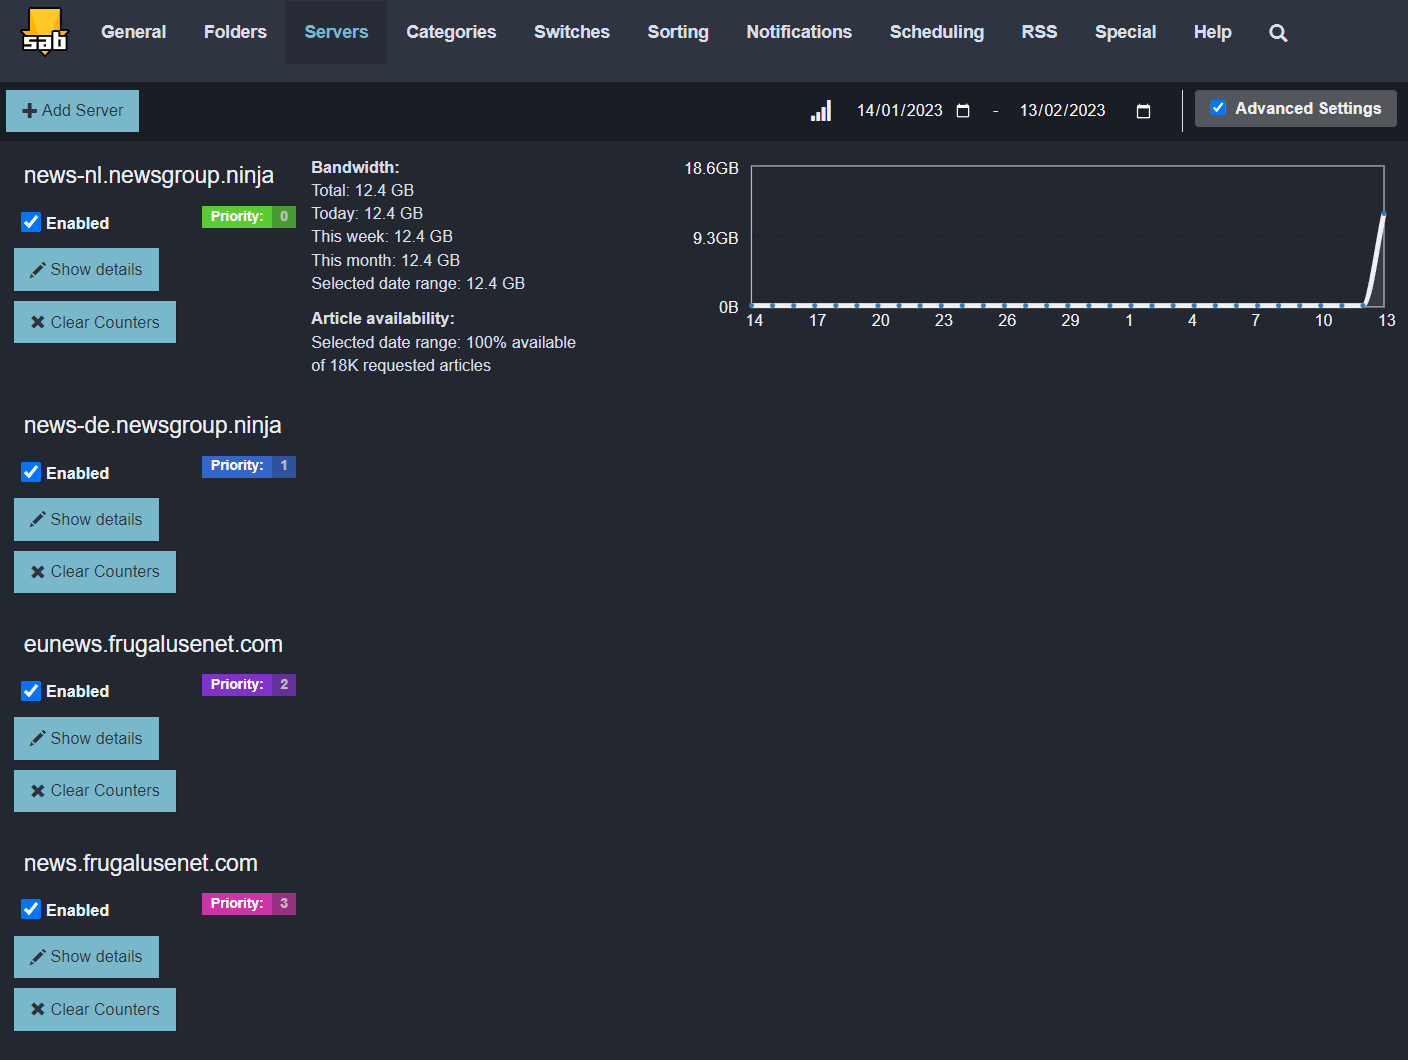
Managing Usenet Servers
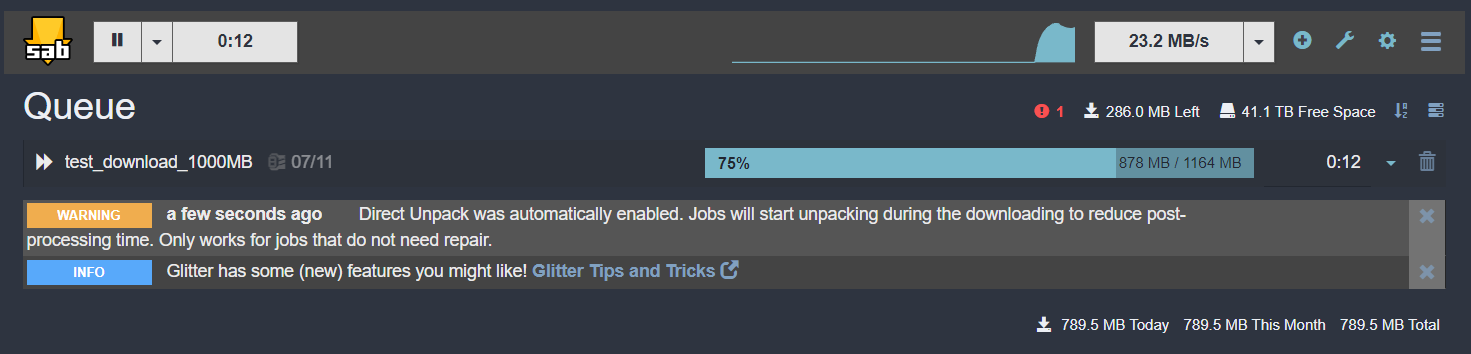
Download the SABnzbd 1000MB test file at: https://sabnzbd.org/tests/test_download_1000MB.nzb
========================
Default Login Credentials
- Username: admin
- Password: adminadmin
Default Username and Password can be changed by navigating to Options Icon → Web UI → Authentication
Change Default Options
Open the Options dialog and make the following changes in order to the default settings.
Download Paths
Goto: Options Icon → Downloads
Connection Settings
Goto: Options Icon → Connection
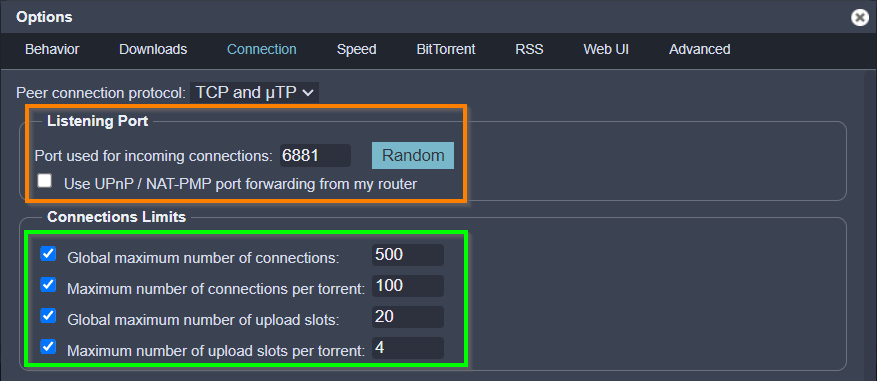
Listening Port
The listening port of 6881 should not be changed, its embedded into the qBittorrent Docker image and routes traffic through the secure Gluetun VPN container.
If you need to change the incoming connection port, change the following variable settings in the docker-compose.env file, and redeploy the qBittorrent Docker configuration:
QBIT_PORT_TCP=6881QBIT_PORT_UDP=6881
Once you've changed these settings in the docker-compose.env file and redeployed the configuration, all incoming TCP/UDP connections on the new port numbers will be routed in through the secure Gluetun VPN connection, then Docker will redirect the traffic to the qBittorrent container, which will still be listening on port 6881.
NOTE: Under NO circumstances should your change the 6881 port inside the application WebUI, and certainly do not enable UPnP / NAT-PMP. The incoming connection is not coming through your home router, it is coming through the secure Gluetun VPN connection.
Connection Limits
These are the default connection limits, you can tune these yourself once you have set up your qBittorrent client.
NOTE: Having too many peer connections and concurrent download sessions may be very ineffficient, and slow down your overall completion rate.
Changing these settings to high will consume your Internet bandwidth and RAM untilisation on your host computer.
Download Speed
Goto: Options Icon → Speed
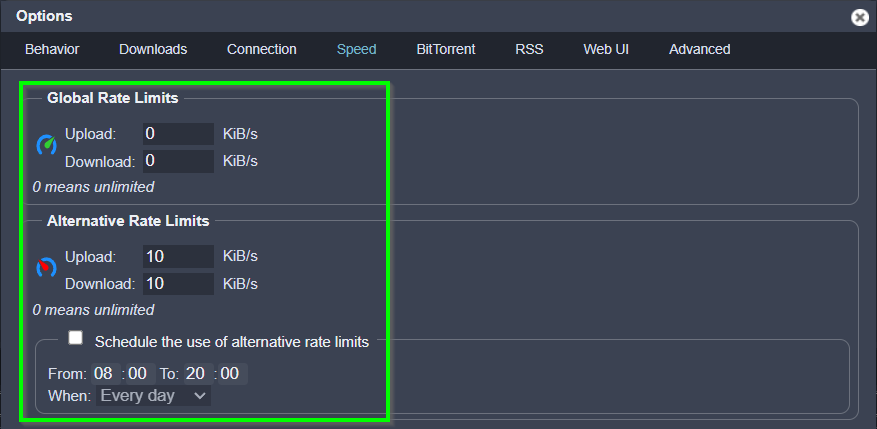
Download Speed
These are the default Global and Alternate rate limits, so you can limit the amount of download bandwith you allow qBittorrent to consume.
If you have a low Internet connection and only want to download while your sleeping, then restrict the Global Rate Limits to a smaller limit, then set the Alternate Rate Limits to a higher number (or "0" for unlimited), then enable the schedule for when the alternate rate limit should be used... i.e. when you're sleeping.
NOTE: If you have a poor internet connection, you should set these limits below your ISP Internet connection speed.
You can test your Internet speed at https://www.speedtest.net/, however just remember your qBittorrent connection goes through the secure Gluetun VPN connection, so that will be a little bit slower due to the additional overheads for the VPN encryption.
BitTorrent Settings
Goto: Options Icon → BitTorrent
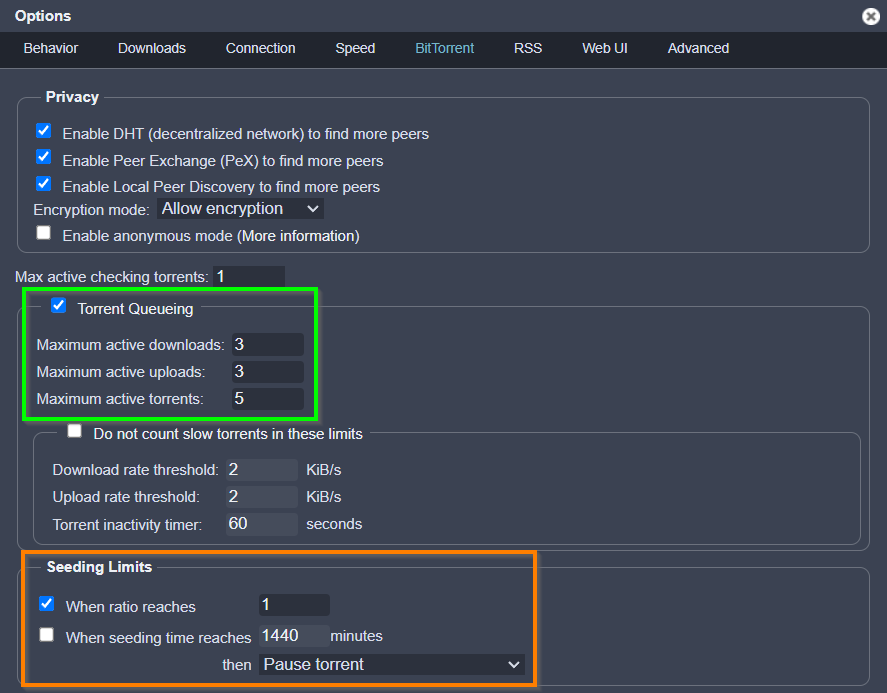
Torrent Queueing
Change the Torrent Queueing settings to tune how many active downloads / uploads / torrents your qBittorrent client will run concurrently.
NOTE: Having too many peer connections and concurrent download sessions may be very ineffficient, and slow down your overall completion rate.
Changing these settings to high will consume your Internet bandwidth and RAM untilisation on your host computer.
Seeding Limits
Eanble the Seeding Limits settings so you are able to seed the torrents after you have finished downloading them.
NOTE: Many private torrent sites / trackers will ban users if they do not seed files after downloading them, and you will to keep your seeding ratio above a minimum level. Private torrent site seed ratios are different, so keeping a reasonable ratio helps maintain good standing in these sites.
WebUI Settings
Goto: Options Icon → Web UI
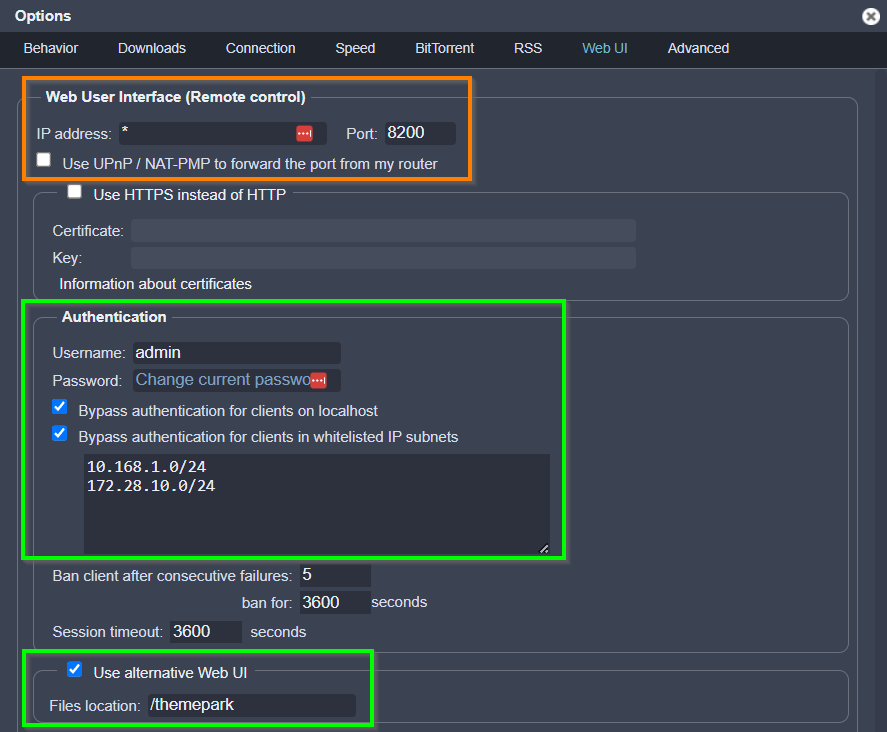
Web User Interface (Remote control)
The WebUI port of 8200 should not be changed, its embedded into the qBittorrent Docker image and routes traffic through the secure Gluetun VPN container.
If you need to change the incoming WebUI port, change the following variable settings in the docker-compose.env file, and redeploy the qBittorrent Docker configuration:
WEBUI_PORT_QBITTORRENT=8200
Once you've changed these settings in the docker-compose.env file and redeployed the configuration, all incoming WebUI connections on the new port number will be routed in through the secure Gluetun VPN connection, then Docker will redirect the traffic to the qBittorrent WebUI, which will still be listening on port 8200.
NOTE: Under NO circumstances should your change the 8200 port inside the application WebUI, and certainly do not enable UPnP / NAT-PMP. The incoming connection is not coming through your home router, it is coming through the secure Gluetun VPN connection.
Authentication
Change the default Username and Password in this section, or disable user authentication entirely for clients on the localhost or local network.
The Docker subnetwork for our media stack is 172.28.10.0/24, as we are going to be setting up a Nginx reverse proxy with secure authencation throught the SWAG / Cloudflare connection, we can add this address into the authentication bypass, as SWAG / Cloudflare Zero Trust will handle authentication and authorisation into your home network
Use alternative Web UI
Themepark Themes have been enabled in the qBittorrent YAML file, you can disable the theme there, or change the theme by setting the following variable in the docker-compose.env environment file, and redeploying the qBittorrent image in Docker.
TP_THEME=nord
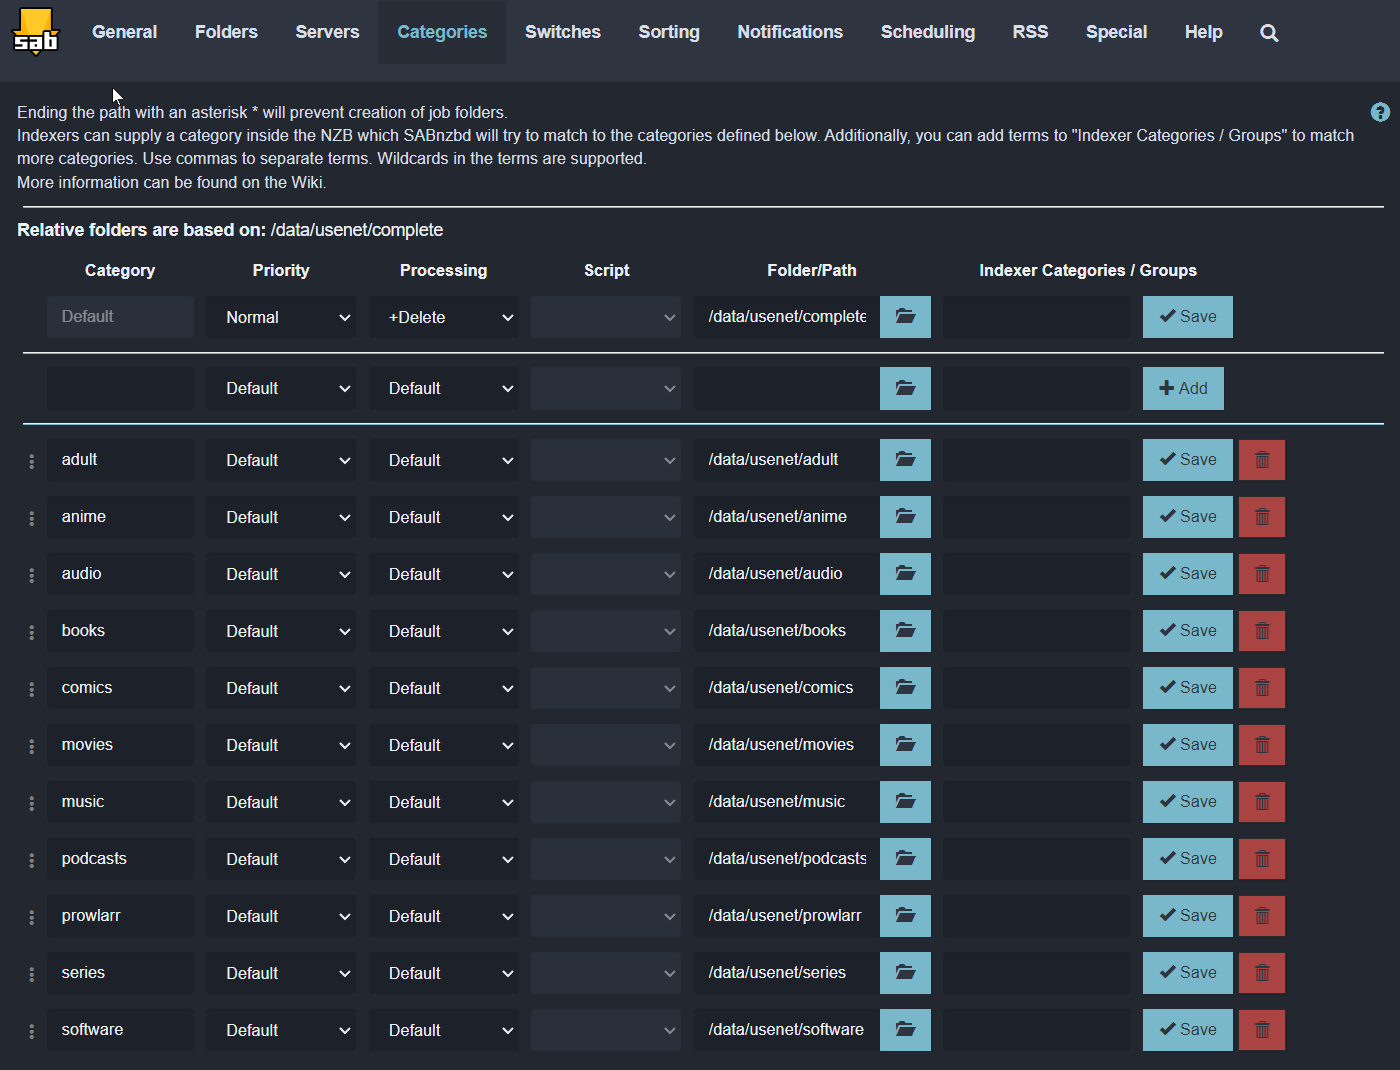
Download Categories
When setting up our media libraries and folders, its important to store certain media types in their own folders, so each of the applications can then be set up to manage, rename and fetch meta data, depending on the media type... i.e. movies, TV shows (series), music etc.. in each of the folders.
To help control the management of media files, we use "download categories" in the Torrent / Usenet download clients, which are then linked to certain folders, so media in the same categories are downloaded into the correct folders, so the *ARR Media Library Managers and Jellyfin can manage the media after its been downloaded.
For example, when a movie is downloaded by qBittorrent, it is assigned the movie category and will be downloaded into the folder /data/torrents/movies inside the qBittorrent Docker container, which is actually mounted on the localhost filesystem in the FOLDER_FOR_MEDIA/torrents/movies folder.
Once the download has been completed, qBittorrent tells the *ARR Media Library Manager responisble for movies it has completed (which is "Radarr"), then Radarr moves the file into its own folder /data/media/movies, which is actually mounted on the localhost filesystem in the FOLDER_FOR_MEDIA/media/movies folder.
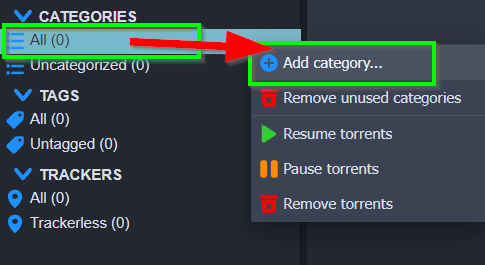
Goto: Right click Categories → Add Category
Warning: Category Names and Save Paths Are Case Senstive
Category Names and Save Paths are case senstive and must be added in lower case, to match the underlaying Linux filesystem inside the Docker images, and / or, the localhost.
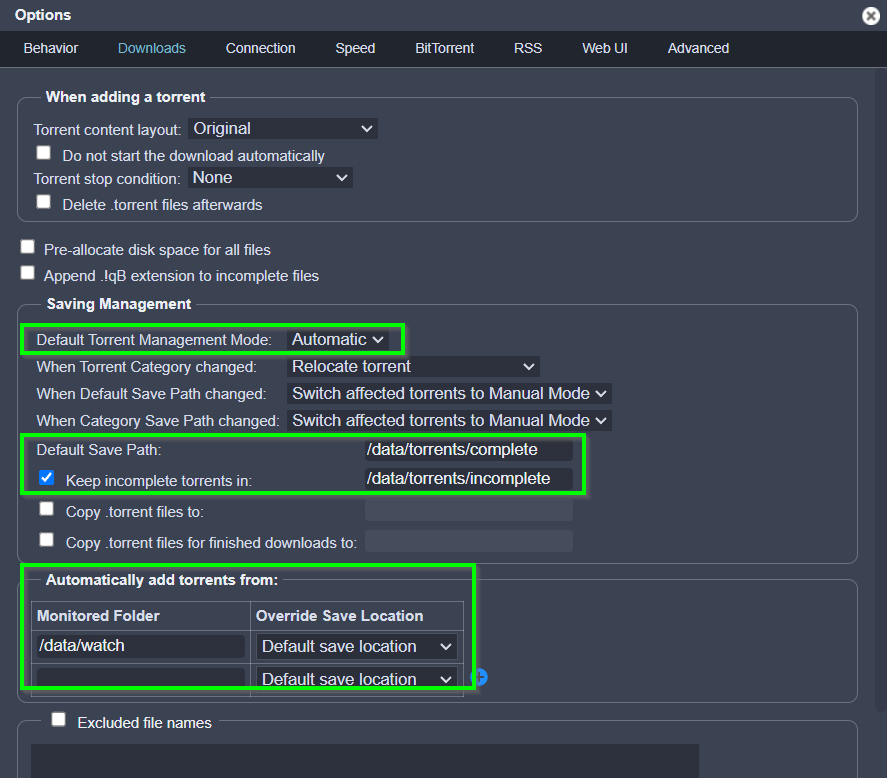
Goto: Options Icon → Downloads
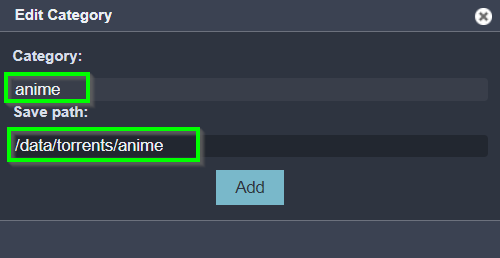
Save Path
Save Path only needs to have the category name, and not the full path, as it is relative to the Default Save Path: which was set as /data/torrents above.
Therefore adding "movies" into the Save Path field will actually be /data/torrents/movies.
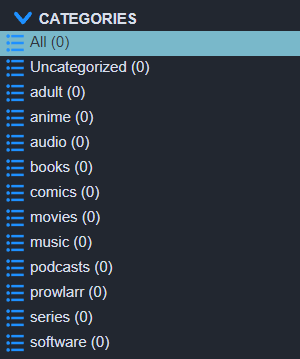
Continue to add the following categories:
Categories Failing To Sort Into Correct Folders
If files are being downloaded by the *ARR Media Library Managers and they are not being sorted correctly by categories and folders, check the following setting on the Downloads Options page:
- Default Torrent Management Mode:
Automatic
Test Secure Connection
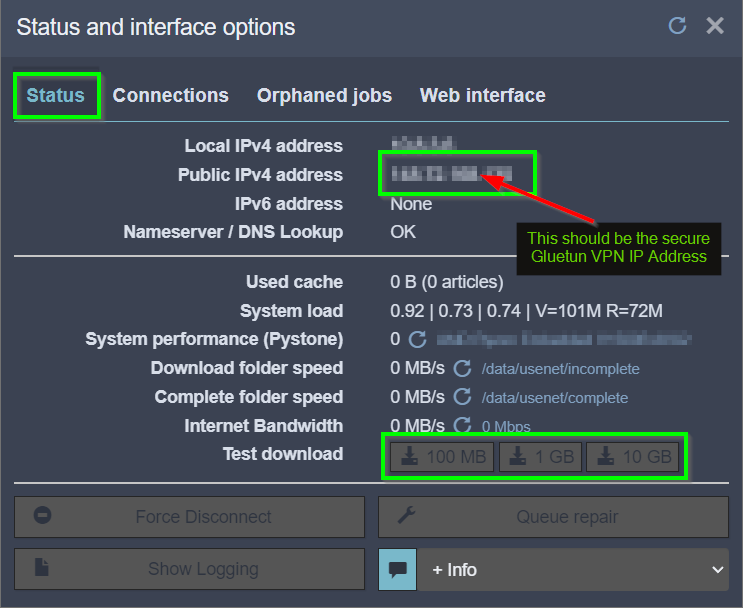
As the Gluetun container is providing an encrypted VPN tunnel for the entire Docker stack, its important to first check the VPN is providing privacy / obscurity for your Internet connection and torrent traffic.
From any computer in your network, you will be able to see what the IP Address for your Internet connection is by going to ifconfig.io
Now log onto your Docker host and attach the console to the qBittorrent container using the following command:
Connecting To qBittorrent Container with Portainer
You can also connect to the qBittorrent container using Portainer, by selecting the container you with to connect to, then select >_ Console
Once you have successfully connected to the qBittorrent Docker container, run the following command on the console, to check the IP Address which it is using through the VPN tunnel.
The IP address of the remote / secure VPN connection will be displayed. Type exit to disconnect from the Docker interactive session.
NOTE: If the Gluetun container is not running, or does not have an active VPN connection, then no traffic from any of the Docker containers will be allowed to go out to the Internet; it is all blocked unless a secure VPN tunnel is active through Gluetun VPN.
NOTE: If you are using an active VPN account and are not able to secure a VPN connection, you should seek assistance before progressing.
Synology users may need to check VPN / TUN prerequisite details in this article, and seek guidance from the Synology community: Synology prerequisites · qdm12/gluetun Wiki
Download Torrent Test File
Now qBittorrent is fully configured and secure behind the Gluetun VPN, you should check downloads are working correctly, by downloading a simple Torrent test file.
Manual Watch Download
Head over to https://ubuntu.com/download/alternative-downloads to Ubuntu's BitTorrent page, and download one of the ".torrent" files, and copy it into the FOLDER_FOR_MEDIA/watch folder on the Docker host, which is mapped to the qBittorrent container folder /data/watch.
As qBittorrent is monitoring the /data/watch folder inside the container for incoming ".torrent" files, the torrent download will start after a short period. Once completed, the downloaded torrent will be moved to the root of the /data/torrents folder, as no category was provided using the manual download step (FOLDER_FOR_MEDIA/torrents).
This is a good process to use qBittorrent manually for your own download requirements.
Download Link with Category
You can also download torrents by copying the Download URL or Magnet Link address of the torrent, and clicking on the "Add Torrent Link" button.
Paste the link into the "Download URL or Magnet Link address" field, and select the category which best suits the torrent. In this case, we'll select one of the other torrent download links from the Ubuntu test above, use the "software" Category, then select Download.
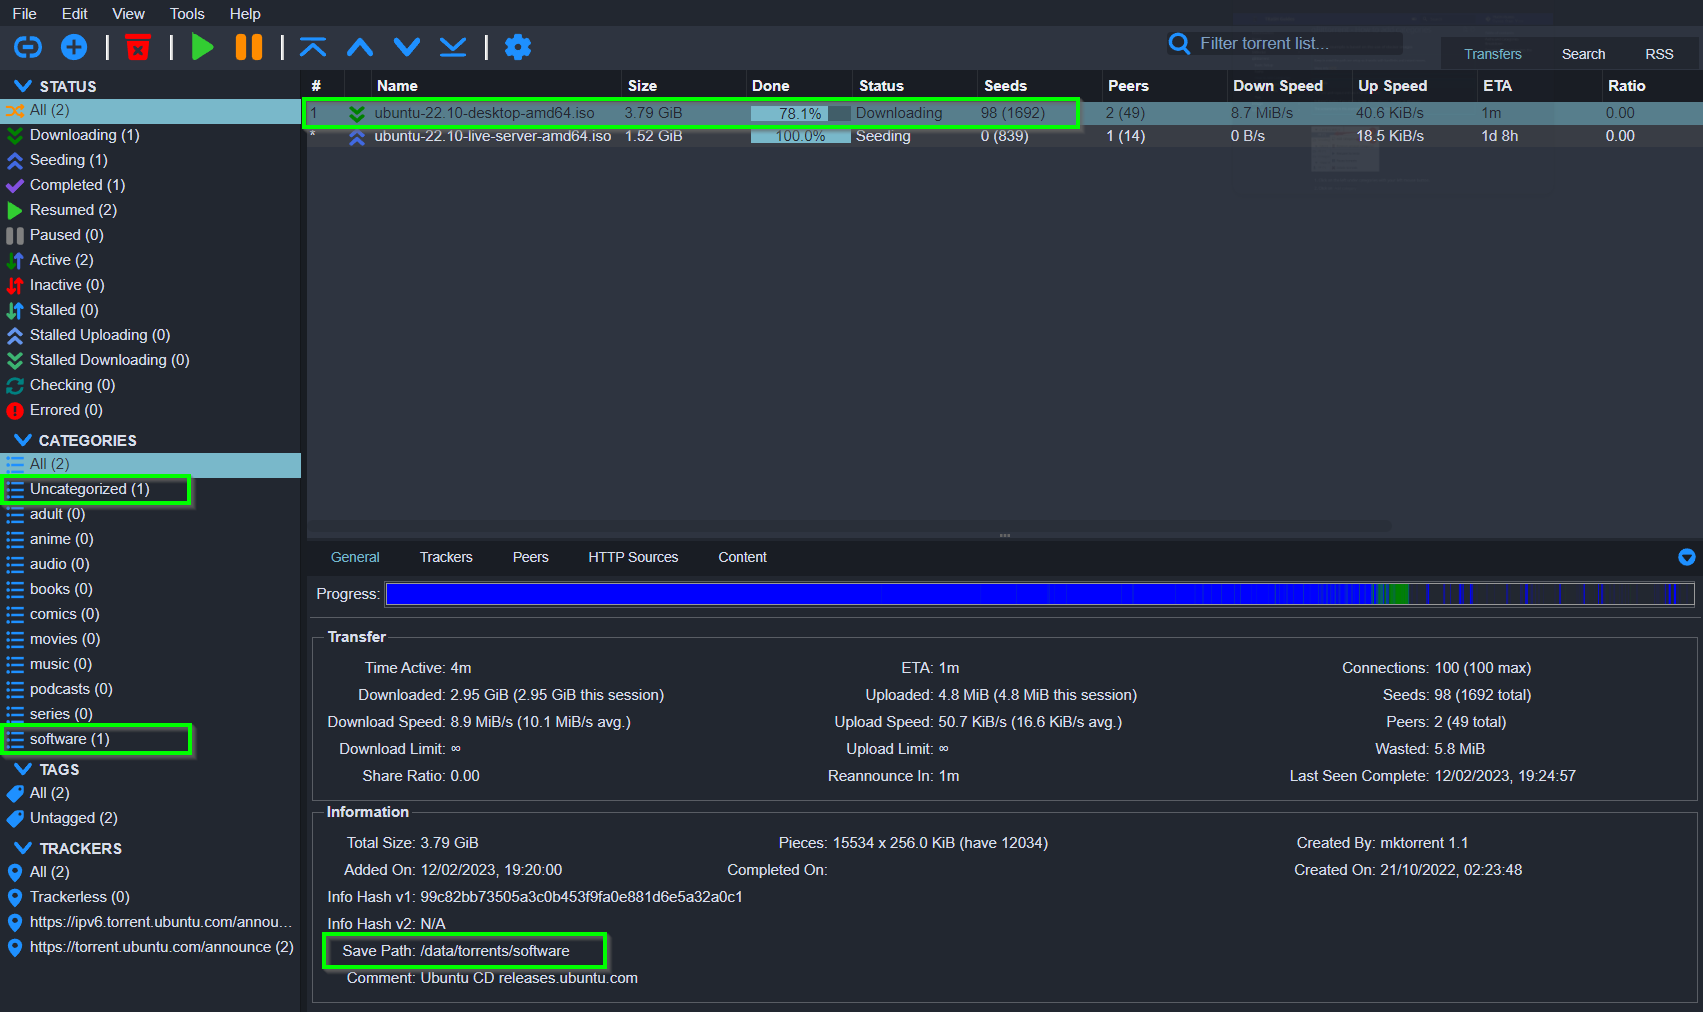
If you inspect the completed torrent downloads, you will notice the manual download was not association with a category and was moved into the /data/torrents directory, while the second download was assigned a category and was moved into the /data/torrents/software directory.
The downloaded test torrents can now be safely deleted using the WebUI.
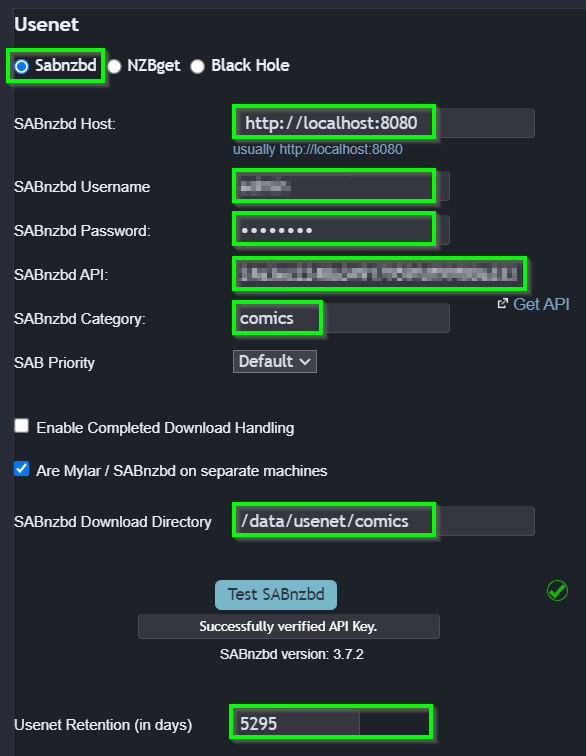
Add SABnzbd to *ARR Apps
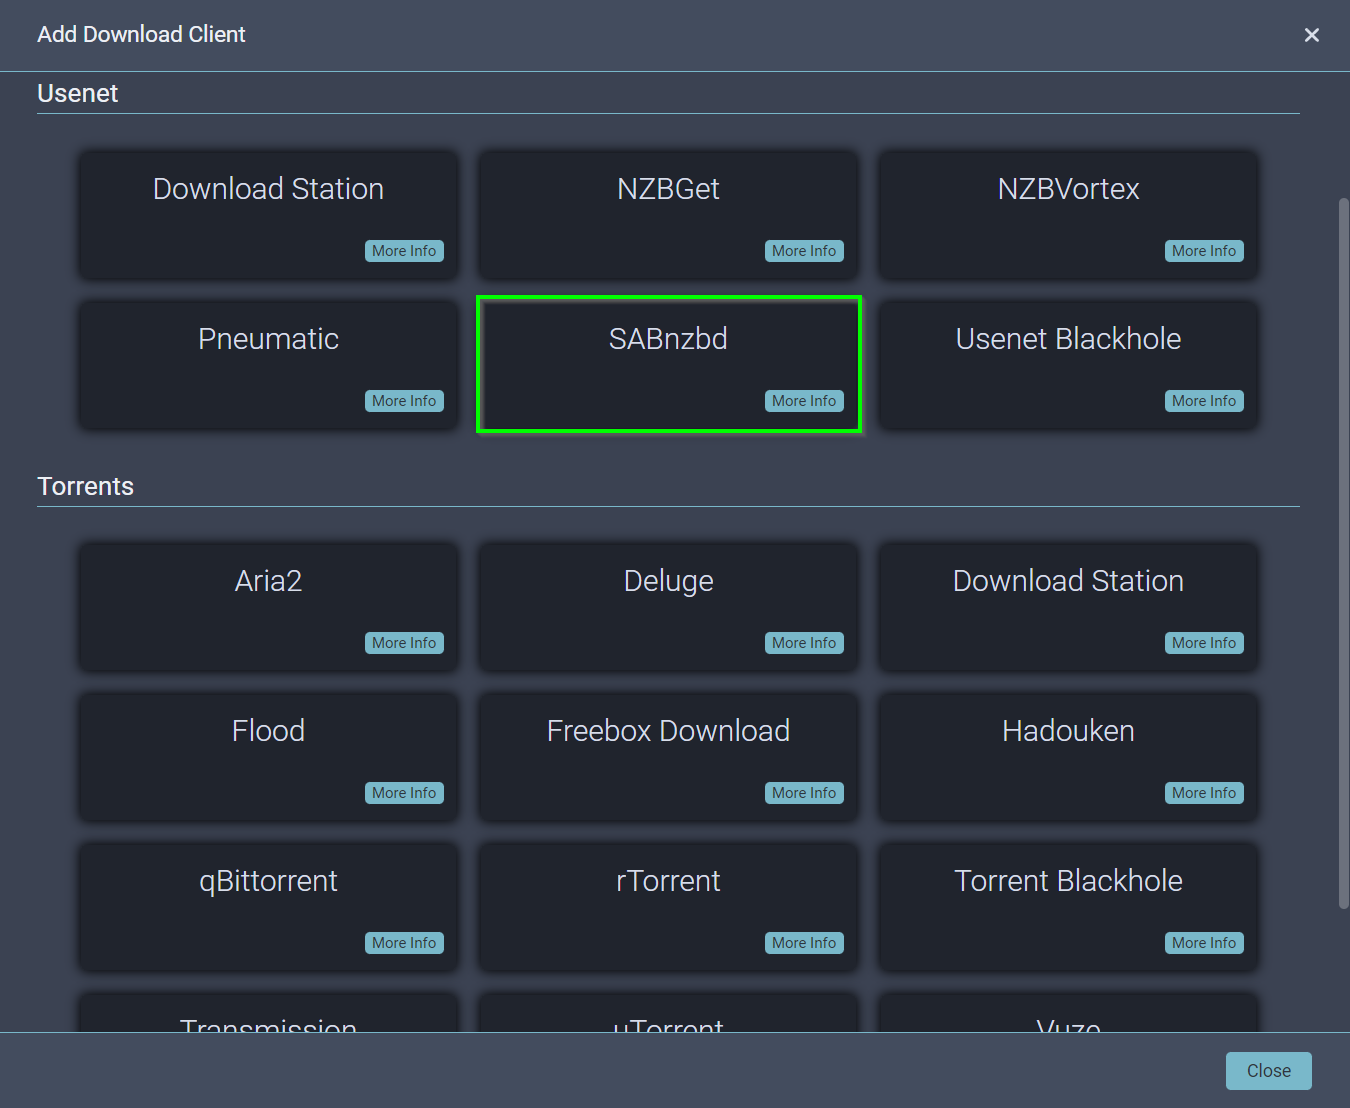
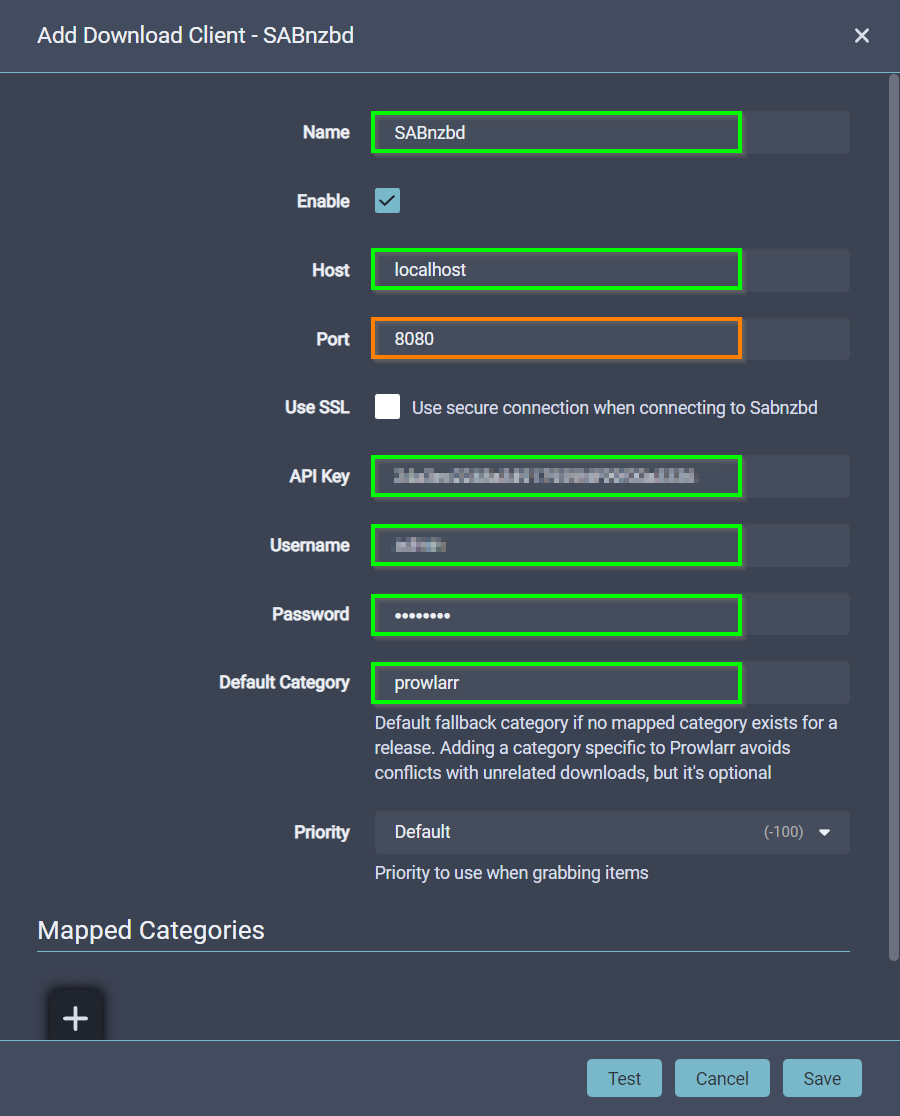
Note: SABnzbd API Key
You can find your SABnzbd API key at: http://localhost:8100/sabnzbd/config/general/
| *ARR Application | Add Downloader Page | Default Category |
|---|---|---|
| Prowlarr: | http://localhost:9696/settings/downloadclients | prowlarr |
| Radarr: | http://localhost:7878/settings/downloadclients | movies |
| Sonarr: | http://localhost:8989/settings/downloadclients | series |
| Lidarr: | http://localhost:8686/settings/downloadclients | music |
| Readarr: | http://localhost:8787/settings/downloadclients | books |
| Whisparr: | http://localhost:6969/settings/downloadclients | xxx |
| Mylar3: | http://localhost:8090/config#tabs-3 | comics |